
Mass Payout Documentation
Explore our Mass Payouts API documentation and examples to integrate borderless into your application. Our payout documentation will provide you with all the required information to unlock payout capabilities for your operations.
Contents
Introduction
borderless is a direct bank to bank payment solution with $0 wire fees. We have created a suite of products to streamline your operations such as Mass Payouts, Accept Bank Payments Online and quick B2B payments. The borderless GraphQL API allows payout experiences to be customized to your business’ needs. We have built our solutions for marketplaces, small-businesses, enterprises, and dreamers around the world.
With our Mass Payout API you can pay your contractors, workers, distributors, vendors in seconds! The funds get delivered straight to their bank account with $0 wire fees and currency conversion included. These docs will provide:
- Quick Start: Step by Step on how to get started
- Integration methods: Choose your integration method to unlock global bank payouts
- Guide & Resources: Follow our API guides for easy integration
Note: The borderless Mass Payout API takes about 1-4 days to implement. Integration time depends on your company needs, and development resources.
Payout Experience
Your payout experience is important to us that’s why we have built borderless to be flexible to your needs. We have built 2 payout experiences which can be used. Choosing a payout experience will impact your development time to integrate with our solution.
- Mass Payout API – This method allows payouts to be customized to your specific needs.
- Mass File Upload – This requires no development work.
Mass File Upload
Mass File Upload is a file system that allows you to a process multiple payments by manually uploading a single request file to our dashboard. A mass file will contain payment details such as your payee handle, payment description, amount and purpose of payment. To learn more about this mass payout method, contact your account manager or our sales team here.
Getting Started
Ready to unlock global bank payouts? Our Mass Payout API guide will walk you through how you can pay multiple users around the world in seconds. The funds gets delivered straight to their bank account with $0 wire fees and better exchange rates than most banks or PayPal.
Step 1: Sign Up
Before using this guide, ensure you have a business account registered on our live environment for production use.
Step 2: Enable Mass Payouts
Once you have an account registered, contact borderless support in order to enable mass payouts for your account.
Upon enabling mass payouts, borderless will provide you with two pieces of information that you should not share with anyone, your issuer id and your issuer secret key.
- The issuer id and secret are required for creating a JWT (JSON web token) that will be used when sending your request to the borderless API to ensure that you are the one requesting the payments be sent.
- We will also provide you with a suite of bank accounts for your sandbox environment. These will be unique to your company.
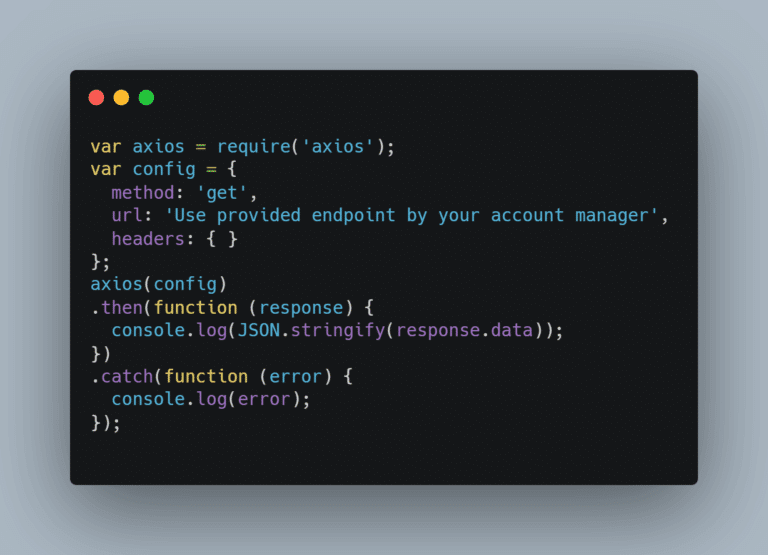
Once you have mass payouts enabled you can begin making requests. In order to make a mass payout request a POST request must be sent to the mass payout endpoint. This post request can be made either manually (using Postman or similar) or programmatically. Contact your account manager for staging and production location endpoints.
Step 3: Access Sandbox Environment
3.A. Create Your Sandbox Account
Once you have an account registered, contact borderless support in order to enable mass payouts for your account.
3.B. Create Your Sandbox Users
In order to test our Mass Payout functionality in our Sandbox environment, you will need to create Sandbox users. In order to do so, you use the following sandbox endpoint and create test accounts using the bank data provided with your API key.
Here are some quick video tutorials on how to create an account:
- How to register and verify your email
- How to add a bank account – Use your sandbox bank credentials. If you are having difficulty, contact your account manager.
- How to upload ID (Optional) Some accounts may require uploading an ID. If you need an ID for your Sandbox accounts, contact your account manager.
Step 4: Follow Our Guide
You are all set to get started. Follow the integration guide below to start paying out your clients using code with $0 wire fees. If you have any questions, please contact support here.
Payout API Guide
Ready to integrate our Payout API? Follow these simple steps to get started today!
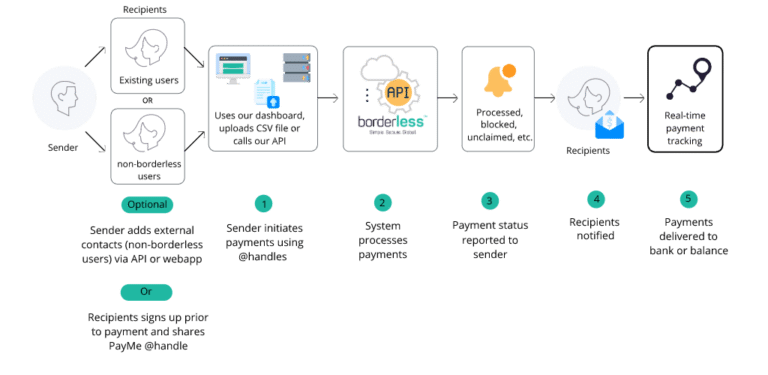
Adding External Contacts Or Registering Users
You can make payments to anyone. Your company has the option to either add them as a contact by entering their details or refer them to borderless to sign up and share their handle.
Option A: Add Contacts – Recipients do not need a borderless account
With this option, you can pay non-borderless users by entering their details. You will need to collect their details on your own and add them as contacts. Once added, borderless will create a unique and auto generated @handle to utilize for API payouts.
Option B: Register borderless Users – Recipients create a borderless account
With this option, you can pay borderless users using just @handles. Your company must inform your clients to create an account with borderless. They can simply go to our sign up page on our website. Your account manager has amazing resources such as email templates, blog posts and more to guide you through this process.
By creating an account, they will create their unique borderless identifier which is called a Handle “@ClientName”. This Handle is important to make payments to your clients as you no longer need to collect any banking information. You can choose to collect your client’s Handle by creating an entry field in your application for your users. Check out the Data Requirements section for more information about Handles.
Sandbox Users
In order to test our Mass Payout functionality in our Sandbox environment, you will need to create Sandbox users. In order to do so, you use the following sandbox endpoint and create test accounts using the bank data provided with your API key.
Here are some quick video tutorials on how to create an account:
- How to register and verify your email
- How to add a bank account – Use your sandbox bank credentials. If you are having difficulty, contact your account manager.
- How to upload ID (Optional) Some accounts may require uploading an ID. If you need an ID for your Sandbox accounts, contact your account manager.
Authorization Header
Request payloads must be signed with client’s private key. borderless validates the signature using the client’s private key set which is given at onboarding. If you do not have an account API key, request your API key today.
- Inside the POST request header, there must be a key of “authorization” with a value that is a JWT. The payload of the JWT must provide a key of “issuer” that points to the value of your borderless issuer id.
- This JWT must be signed with the provided borderless secret key in order for payments to be executed. Without signing the key payments cannot be verified to come from your account.
- For help manually generating a JWT see: https://jwt.io/
- We recommend the jsonwebtoken npm package: https://www.npmjs.com/package/jsonwebtoken
- To prevent token reuse, the JWT must be used within 5 minutes of creation. The issued at time (iat) key must be present in the payload of the JWT for validation. Requests will be denied without the “iat” value in the JWT payload
External Contact: Send Post Request
Data Requirement
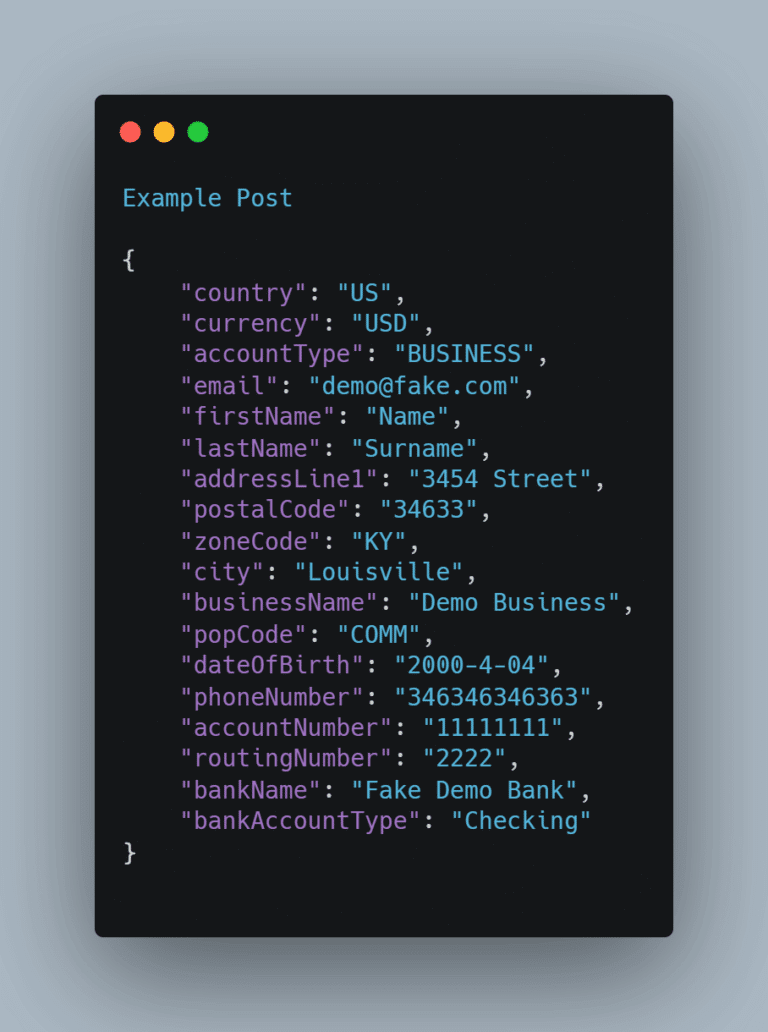
Provide the following data requirements when sending a POST request to the External Contact endpoint.
The body of the request must contain the following REQUIRED fields:
- Country (2 letter country code, all caps)
- Currency (3 letter currency code, all caps)
- AccountType (either PERSONAL or BUSINESS)
- Email (string)
- FirstName (string)
- LastName (string)
- AddressLine1 (string)
- ZoneCode (a list of valid codes per country can be obtained by using our /zoneCodes endpoint)
- PostalCode (string)
- City (string)
- PopCode (purpose of payment code, a list of valid pop codes can be obtained by using our popCodes endpoint)
- PhoneNumber (string)
- AccountNumber (primary identifying number of bank account (eg. account number or IBAN) (string)
- BankName (string)
- BankAccountType (CHECKING or SAVINGS)
In addition to the above required fields, the following fields may be required on a per country basis:
- BusinessName (required for business accounts)
- AddressLine2 (string)
- PlaceOfBirthCountry (required for Indian accounts) (2 letter country code, all caps)
- PlaceOfBirthRegion (required for Indian accounts) (zoneCode, can be founds at /zoneCodes endpoint)
- PersonalTaxId (required for Mexican and Argentinian accounts) (string)
- BusinessTaxId (string
- RoutingNumber (bank routing number) (string)
- BranchName (bank branch name) (string)
- BankSwiftBic (string)
- DateOfBirth (must be of format YYYY-MM-DD, string)
Example
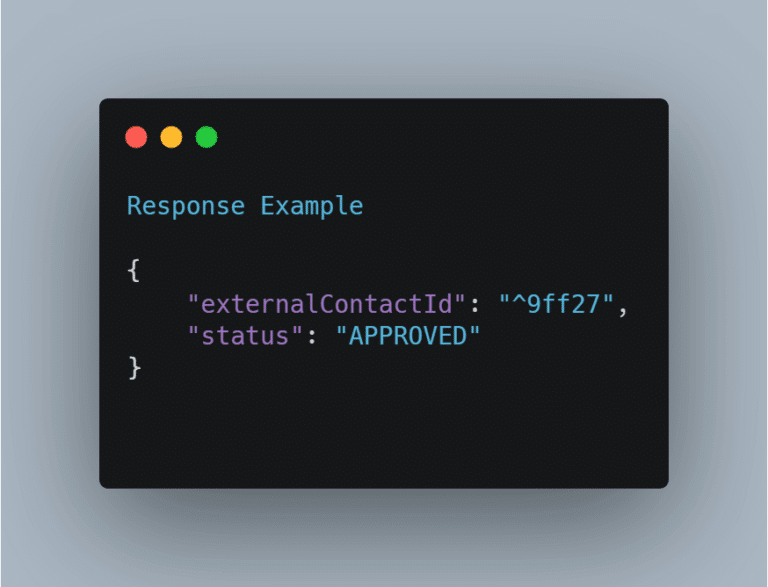
Handle Response
Successful Response
With both the correct header authorization and the correctly filled out body your post request is ready to send. After sending the requests you should receive a response similar to the following below. Please note that your request may take up to 60 seconds for the response to appear.
Return data:
{
externalContactId,
benestatus,
message
}
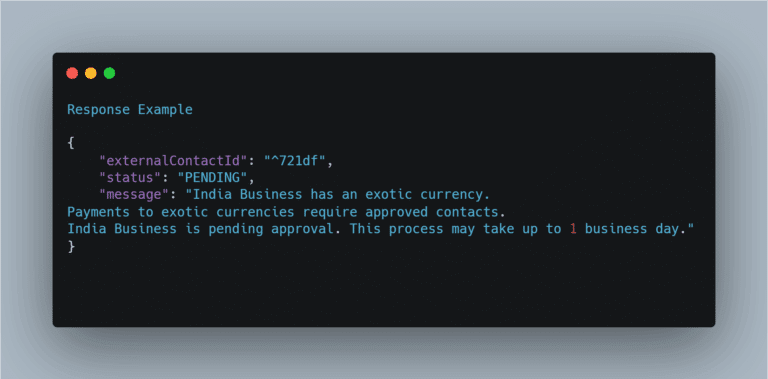
Note: for most external contacts, they will be approved automatically. However, for certain accounts with exotic currencies, it may take several days to approve before making payments to this beneficiary. These contacts will contain a status of PENDING and a message explaining further details.
Response With Errors
You may also encounter some errors when creating a contact which will be relayed in the response. An instance of this would be if there were missing fields. See example below.

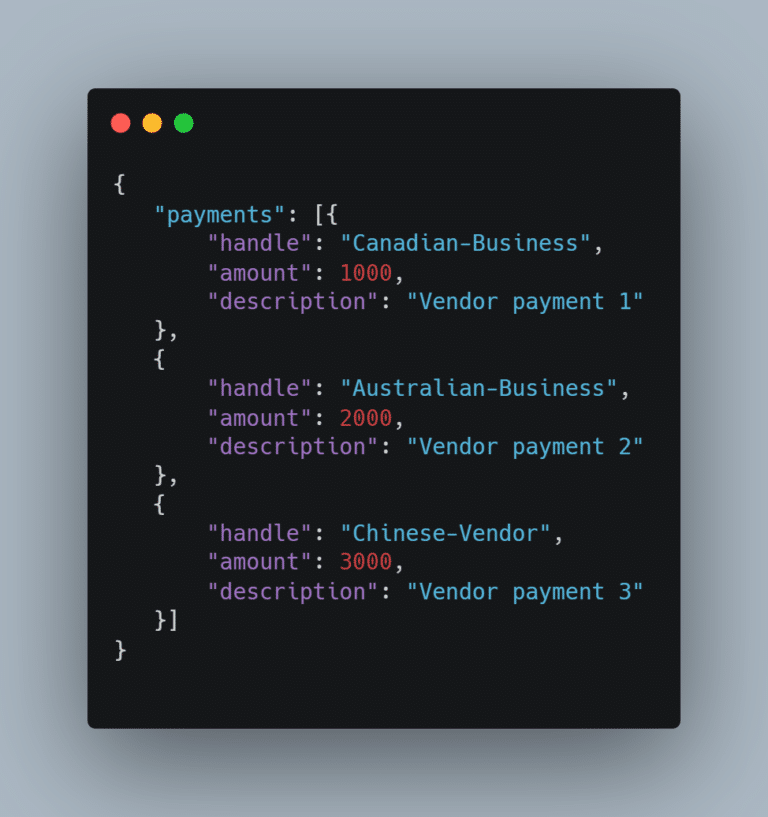
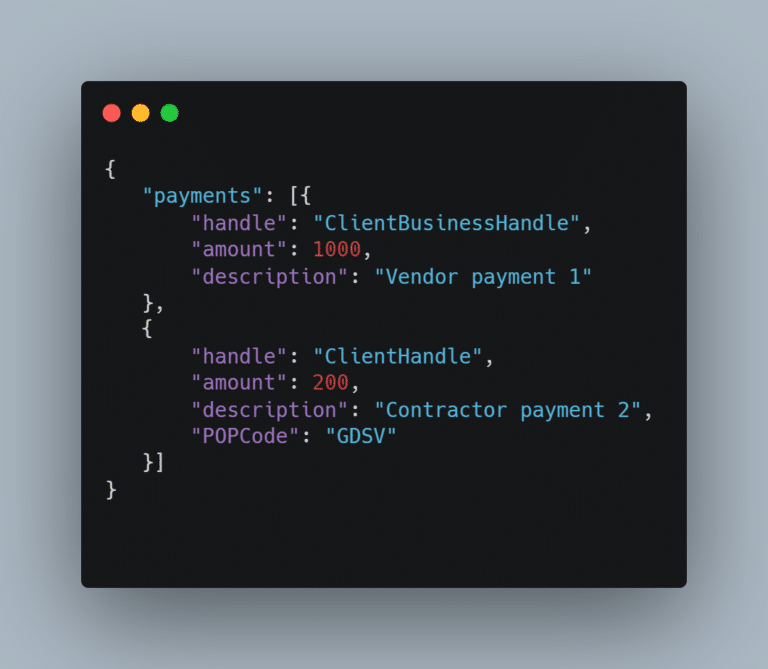
Payments: Send Post Request
Data Requirement
Provide the following data requirements when sending a POST request to the Mass Payout endpoint.
The body of the request should contain a key of “payments” with the requested payments contained in an array. Each payment must contain the following information:
- Handle – An account handle of who the payment should be sent to, without the “@”. This is a unique identifier for each account. This data needs to be collected prior to making payments. This avoids the need for you to collect banking information helping you reduce risk and limiting data liability. We recommend that your customers share this data on your platform for you to store in your database.
- Amount – A non-negative amount in your home currency to send the recipient. The funds will be debited in your home currency and delivered to the recipient’s bank account in their home currency. borderless auto-detects the recipient’s currency and converts the funds with better exchange rates than most banks or PayPal.
- Description – A description of the payment being sent with 60 characters max. This will be shown to the recipient. Maximum number of characters is 60 characters including spaces.
- PopCode – POP stands for Purpose of Payment. It is only required for payments to borderless personal accounts. You do not need to a POP if the payment is being submitted to a borderless business account.
POP CODE
POP Description
“Code”: “COMM”,
“Commission Payment”
“Code”: “GDSV”,
“Goods And Services”
“Code”: “INTC”,
“Intra Company Payment”
“Code”: “IVPT”,
“Invoice Payment”
“Code”: “SUPP”,
“Supplier Payment”
“Code”: “MDCS”
“Medical Care Services”
Example
Example With POP Code
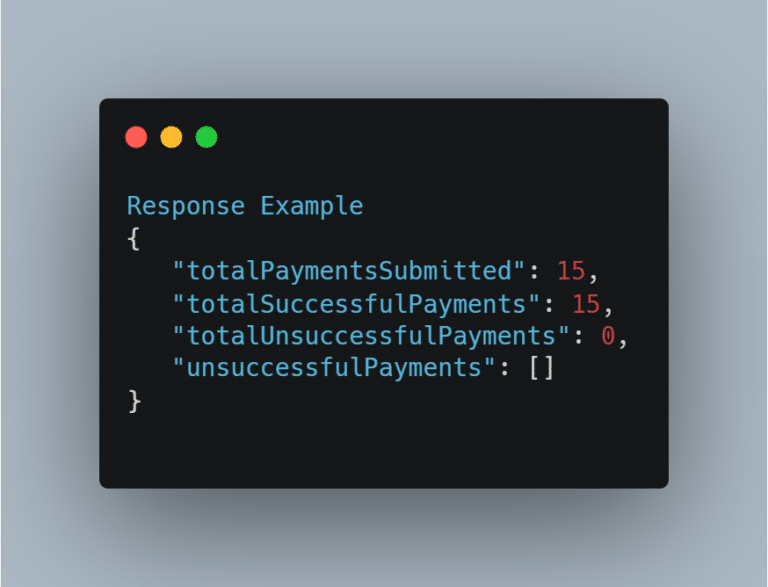
Handle Response
Successful Response
With both the correct header authorization and the correctly filled out body your post request is ready to send. After sending the requests you should receive a response similar to the following below. Please note that your request may take up to 60 seconds for the response to appear
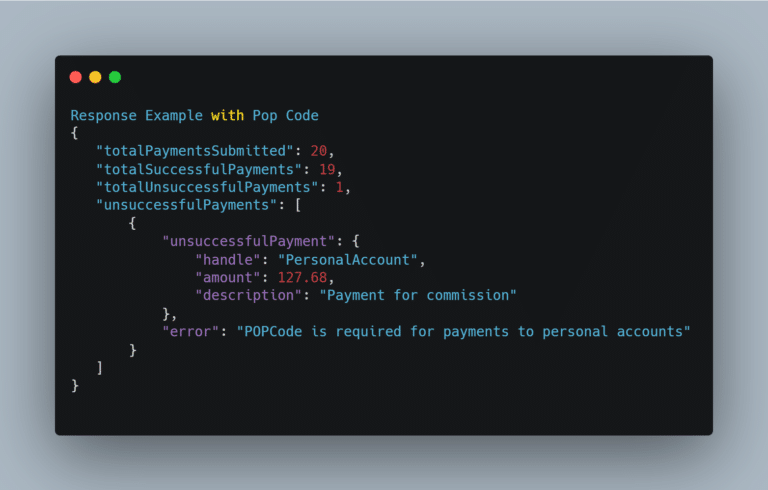
Response With Errors
You may also encounter some errors with your payments that will be relayed in the response. An instance of this would be if a payment being sent to a personal account was missing the POPCode. See example below. Refer to the common errors section below for additional error examples.
Notifications
Once a payout is successful, borderless notifies the recipient immediately via email where they can track the payment in real-time. You will not be notified for every single payout. If you would like to be notified for your mass payout requests, you can use webhook notifications to keep up-to-date on your mass payouts API requests. You will also receive webhook notification for incoming payments if you have integrated our E-commerce plugin. Refer to the webhooks section below on how to get started.
Common Errors
We have identified a list of common errors you may encounter when you integrate our API. Here is a list of a few and how to solve them:
- No issuer provided – In the authorization header, there is no key of issuer in the payload of the JWT.
- Mass payout not enabled for this account or incorrect token signature – Mass payouts have not been enabled for this account or the provided authorization jwt is not signed with the correct secret
- No payment information given for mass payout – The body of the request is missing the payments key or the array under the payments key contains no payments.
- More than 50 mass payouts – Currently mass payout supports a maximum of 50 payouts at once.
- Could not find handle for “XXXX” – Unable to find the account for the provided handle.
- POPCode is required for payments to personal accounts – POPCode must be provided when making payments to personal accounts.
Supported Countries
borderless supports sending payouts to the following countries. The response body will contain an array with the following information for each country currently supported by borderless.
- Name – String – The English language name of the country
- Code – String – 2 character ISO-3166 abbreviation of the country
- Currency – String[] – Array containing the 3 character ISO-4712 abbreviation of the currencies supported in that country
Request
Example Response

Webhooks
Using webhooks allows us to communicate with your system in real time whenever one of your clients pays with borderless™ or whenever you complete an API Request.
A webhook is a notification sent from borderless when an event is triggered without the need to submit a request. borderless will send an HTTP POST request containing the data that is created, to your webhook listener URL.
To get started, you will need a secure URL on your server that is ready to accept and process a POST request containing a JWT in the body. For your security, we encode each webhook with a unique key (“Secret Token”) that you will use to decode and verify our updates to your system.
To enable webhooks, go to your Developer tab in your Dashboard and add your URL. Go to Sandbox Dashboard , or Go to Production Dashboard
We strongly advise you to use a URL that uses TLS (https://) for secure communication and that you verify our webhook signature. When your webhook is setup, you will no longer receive email notification when a client pays you.

Error Handling
The borderless GraphQL API uses standard HTTP Status Codes to indicate whether the request succeeded or failed. The errors might also include a message to specific exceptions that happen in processing the request.
The following table indicates the categorizes of the status codes which are used by the borderless GraphQL API:
2xx– The API request was successful4xx– The API request failed5xx– A server error occurred
